On March 21, 2024, Google announced that “conversions” would be renamed “key events.” GA4 will still use “conversions” in reports measuring Google Ads campaign performance. This change is being rolled out gradually, so you may still see “conversion” in your reports. We’ll update this article as the transition progresses.
Google Analytics 4 (GA4) tracks important web interactions for your business, referred to as conversions or “key events.” These events are tied to your business goals, such as a completed sale on an online store, a form submission on a B2B site, or an online restaurant reservation.
This guide will show you how to set up GA4 conversion tracking for your website and explain how conversions (key events) can help you assess your business performance, making your marketing efforts more effective.
How GA4 Tracks Conversions
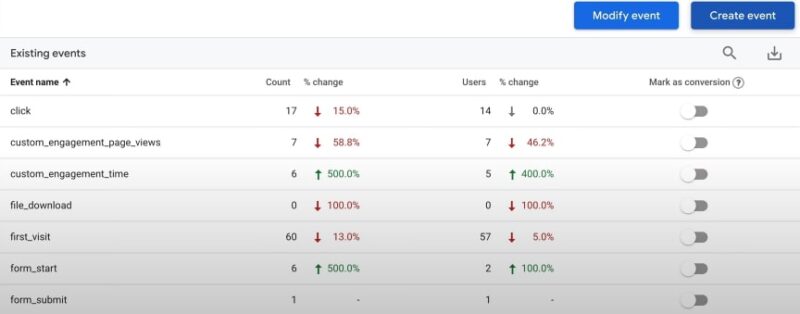
In Google Analytics 4 (GA4), all web interactions are recorded as events. These include actions like page views, file downloads, scrolls, clicks, and purchases, forming the basis for all tracking in GA4 and essential for conversion tracking.
Some events are automatically tracked by GA4 without any setup needed on your part. For information on these, refer to our GA4 event tracking guide.
However, certain events, such as form submissions, require manual setup.
Related: The Ultimate Guide to Google Analytics
How to Set Up and View Conversions in GA4
Tracking key events (formerly known as conversions) in Google Analytics 4 (GA4) is essential for understanding how users interact with your website and achieving your business goals. Here’s a step-by-step guide to setting up and viewing conversions in GA4.
Step 1: Identify Valuable Interactions
First, determine which interactions on your website are valuable for your business.
These could be actions like form submissions, completed purchases, or newsletter sign-ups.
For this example, we’ll focus on tracking a form submission as a key event.
Step 2: Set Up a GA4 Event
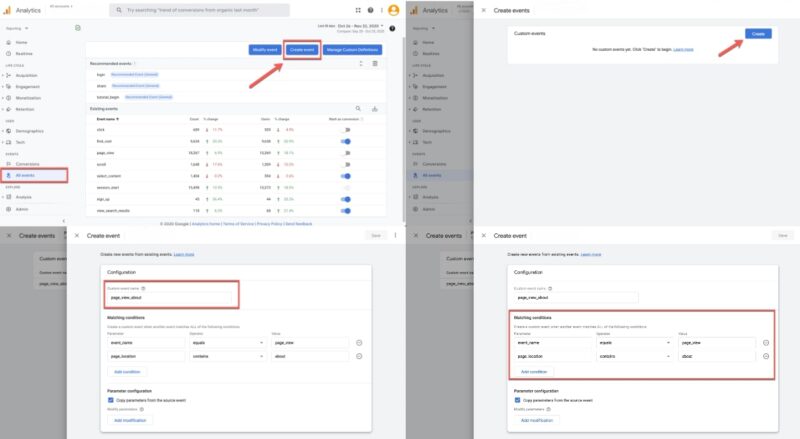
- Log in to Google Analytics: Start by logging into your Google Analytics account. Click on the “Admin” button located in the bottom-left corner of the screen.
- Navigate to Events: In the “Admin” area, under “Property settings,” click on “Events” under “Data display” in the left-hand navigation bar.
- Create a New Event: Click on the “Create event” button to set up a new custom event.
- Name Your Event: In the event configuration window, enter a name for your event in the “Custom event name” field. Use descriptive names like “form_submission” or “generate_lead” to make it clear what the event tracks.
- Set Matching Conditions:
- Condition 1: Set the event name to “page_view.” This ensures that your custom event only triggers when a new page loads.
- Condition 2: Add a condition to specify the thank you page that appears after the form submission. Set the parameter to “page_location,” the operator to “contains,” and enter the path of the thank you page URL in the value field.
- Save the Event: Click the “Create” button to save your custom event. Your new event will now appear in a summary list.
Step 3: Mark the Event as a Key Event
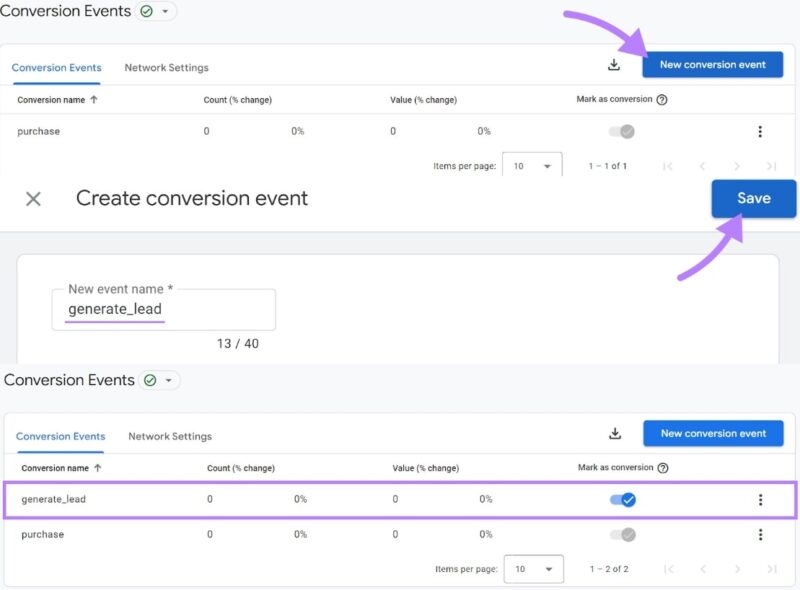
To ensure that this custom event is tracked as a conversion:
- Set as Conversion: In the “Admin” area, go to “Property settings” and click on “Conversions” under “Data display.”
- Create New Conversion Event: Click on “New conversion event,” enter the name of your new event in the “New event name” field, and click “Save.” Your event will now be tracked as a conversion.
Step 4: View Conversion Reports in GA4
- Access Reports: Click on “Reports” in the left-hand navigation bar. Select “Engagement” and then “Conversions.”
- Review Conversion Data: The report will display a list of your conversion events and a chart showing their frequency over time. This helps you visualize how often key events occur.
- Add Secondary Dimensions: For more detailed analysis, click the “+” sign next to the event name to add secondary dimensions. This allows you to see additional data like the source and medium of your traffic.
- Traffic Source Analysis: Select “Traffic source,” then choose “Cross-channel” followed by “Session source/medium” to see where your conversions are coming from. This helps identify which marketing channels are most effective.
Tips for Advanced Tracking
- Track Form Submissions Without a Thank You Page: If your form submissions don’t redirect to a thank you page, you can still track them using Google Tag Manager. Set up a GA4 custom event tag to capture these interactions more precisely.
- Optimize Your Marketing Strategy: Use the data from your conversion reports to refine your marketing efforts. For example, if you notice low conversions from a particular source, it might be time to adjust your strategy for that channel.
Importance of Conversion Tracking
Conversion tracking transforms Google Analytics 4 (GA4) into a powerful tool, enabling you to understand whether your website is achieving its goals. It provides valuable insights into your site and its visitors, helping you drive more business.
Imagine you’re a marketing manager for a dental practice with multiple locations, aiming to generate new patient appointments. In GA4, you set up “generate_lead” as a key event to track appointment requests submitted through your website.
Here are three critical insights you can gain from conversion tracking in GA4:
1. Identify Top-Performing Traffic Sources

Conversion tracking reveals which traffic sources are most effective in helping you reach your goals, allowing you to allocate your marketing efforts and budget more efficiently.
For example, your site produced 112 “generate_lead” conversions in the last 30 days. By adding the “Session source / medium” dimension to your conversion data, you can identify the traffic sources for these conversions.
If the data shows that organic search drives the majority of your conversions, you might decide to focus more on your SEO efforts. Conversely, if social media isn’t performing well, you could test a new strategy on platforms like Facebook.
2. Assess the Profitability of Your Google Ads
Google Ads data integrates seamlessly with GA4, providing insights into campaign performance. This integration helps you manage your budget by showing how much you’re spending to acquire new patient inquiries.
For instance, if your target cost per new patient is $300 and your average cost per conversion is $154.30, you’re well within your budget. Monitoring this metric allows you to adjust your budget allocation between campaigns if needed, ensuring they remain profitable.
[su_note note_color=”#fcba03″]Pro Tip: For a more accurate profitability estimate, consider the conversion rate of web leads to paying customers. If 75% of web conversions become patients, divide your cost per conversion ($154.30) by this rate (75%) to get $205.73, which is still within your $300 budget.[/su_note]
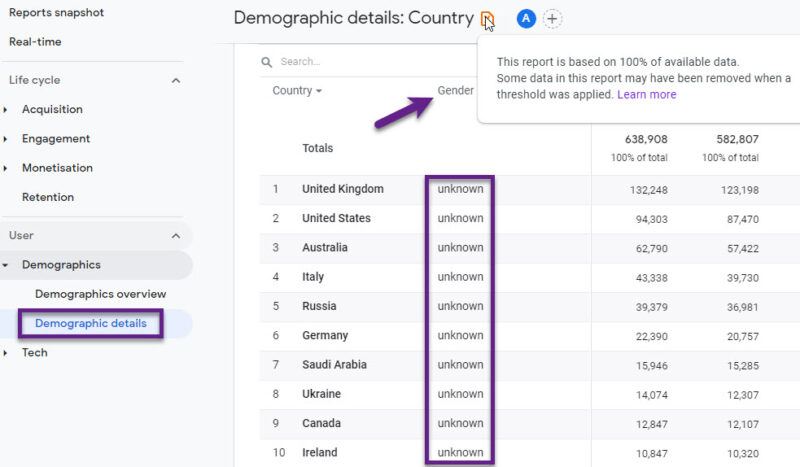
3. Understand Your Audience’s Characteristics
Using key event data in custom GA4 reports helps you learn more about your site visitors, enabling you to better meet their needs and preferences.
If you manage marketing for a dental practice across several cities, understanding where your digital efforts perform best is crucial. Create a GA4 report showing the city and traffic source for each converting visitor to compare campaign performance across markets.
Additionally, if you find that over 63% of your converted visitors use mobile devices, this insight can guide you to prioritize the mobile user experience during a website redesign.
[su_note note_color=”#fcba03″]Tip: Understanding your target audience, which may differ from your current visitors, can provide further insights to increase conversions. Use tools like Semrush’s One2Target to uncover this information and refine your strategy.[/su_note]
By leveraging conversion tracking in GA4, you can gain comprehensive insights into your business’s performance, optimize your marketing strategies, and ultimately drive more successful outcomes.

